Creating a Cascading List
Description
A cascading list is a series of nested pop-up lists that appear as you make selections from the initial lookup window and its related sub-windows. All lookup values are selected at the endpoints of the cascading lists.
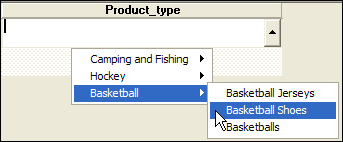
You can often categorize values stored in a lookup into smaller, related groups. By breaking the values in lookup tables into a hierarchical structure of categories and sub-categories, your choice can be narrowed to a subset of values. This lookup table functionality, called cascading tables, is especially useful for simplifying lookup tables that contain many entries and for helping you to make the right choice. You can use as many menus as you need before displaying the choices that are to fill the field (the endpoints in the cascading list). The endpoints can exist either at the same level or at different levels in the cascading list. The menus above were created with the following data.
Camping and Fishing
+Clothing
++Slickers and Boots
++Outdoor Outer Wear
+Gear
++Cooking Gear
++Fishing Lures
++Fishing Poles
Hockey
+Hockey Jerseys
+Hockey Equipment
Basketball
+Basketball Jerseys
+Basketball Shoes
+Basketballs
Creating a Cascading List
If you selected "Cascading List", enter the elements of your cascading menu in the Layout cascading menu field. Refer to Special Characters and Adding Images for formatting instructions.
Optionally, click Add another column... to display the Field Selection dialog box. These fields will be filled at the same time that the current field is filled.
1. Select the field name and click OK.
2. Type entries (one per line) into the column titled with the name of the new field.
Optionally, delete any of the additional columns.
Place the cursor into the additional column.
Click Delete the current column... and Yes.
Optionally, make a selection from Allow exceptions. Indicate which values are allowed in the lookup field, and what should happen when you enter a disallowed value. The options are:
"Allow any value" - Allows choices from the lookup as well as other typed-in values. This is the default.
"Force closest match" - Allows only lookup choices. When you enter a value that does not exist in the lookup list or table, the choice from the lookup that is closest to the value you typed is automatically entered.
"Popup on mismatch" = Allows only lookup choices. When you enter a value that does not exist in the lookup list or table, the Lookup window appears.
"Allow any/fill only on popup"
If you chose to use a popup dialog in step 10, optionally make a selection from Auto popup. Specify whether the Lookup window displays on demand or automatically. The options are:
"Do not automatically popup" - The Lookup window displays on demand. You must click the Pop-up smart button attached to the Lookup field. This is the default.
"Popup on entrance" - The Lookup window displays every time the cursor enters the field.
"Popup conditionally on entrance" - Build a conditional expression that determines whether the window displays automatically. For example, the Pop-up condition: ISBLANK("CUST_ID") causes the Customer Lookup window to appear only if the Cust_ID field is empty.
Optionally, enter an expression that defines the Popup condition. The expression must resolve to either TRUE (.T.) or FALSE (.F.). Click to display the Expression Builder to help you define the expression.
Optionally, select a value from the Position list to indicate where the Lookup window should appear. The listed positions are relative to the Alpha Anywhere Main Application window. The options are:
"Cascading" - displays the window just below the form window title, so that both title bars are visible.
"Top left"
"Top center"
"Top right"
"Middle left"
"Middle center"
"Middle right"
"Bottom left"
"Bottom center"
"Bottom right"
"Custom" - lets you specify the position of the Lookup window in inches or centimeters. Indicate the distance from the upper-left corner of the layout window both horizontally (X) and vertically (Y).
"Sticky" - the popup remembers and reappears at its last position
If you selected "Custom" in step 7, enter position values in the Custom X and Custom Y fields. Enter dimension values in the Custom Width and Custom Height fields.
Special Characters
You can define values (to be saved) that differ from the values (to be displayed). To do this, type the entry using the tilde character (~):
First level menu choice
+Menu choice~Save value
When you select the choice, only the save value (to the right of the tilde) is saved into the field. You can also specify that the entire path leading up to a particular endpoint fills the target field. To do this, use the caret character (^) at the end of the entry.
First level menu choice
+Lookup value^
When you select the choice, the string "First level menu choice, Lookup value" fills the field. A Cascading List lookup can fill in other fields at the same time. To do this, you can create additional columns by clicking the Add New Column button. For information on the remaining parameters, see the discussions of the lookup parameters in Simple Lookup List.
Adding Images
You can place an image to the left of any entry with the syntax {I: {I:" Image_Filename "} or {I: Variable_Name }.
{I:$a5_letter}FedEx
+Ground
+Next Day
+Two Day